There’s something magical about homemade ice cream. Maybe it’s the way the kitchen smells faintly sweet while the custard cooks, or how everyone wanders in pretending not to be checking if it’s ready yet.
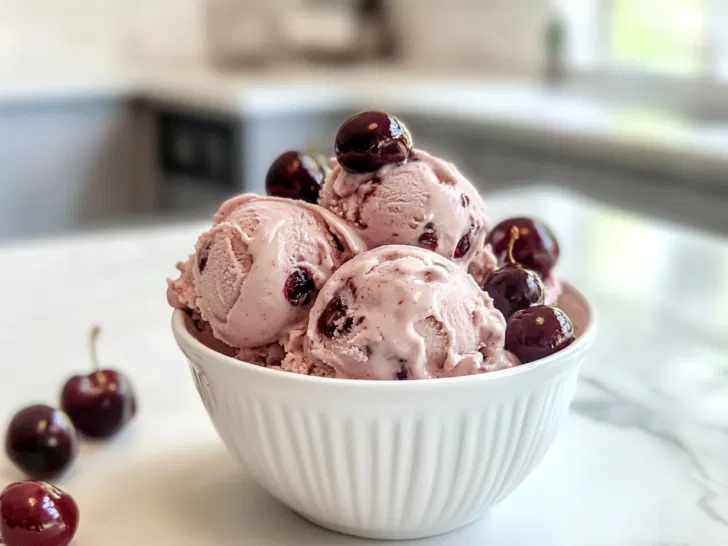
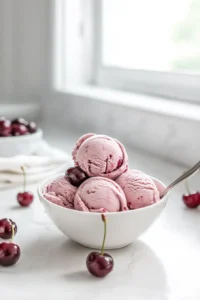
This Cherry Garcia Ice Cream is one of those recipes that instantly brings joy, creamy, sweet, full of dark chocolate pieces, and juicy cherries. It feels like summer in a bowl, no matter what the calendar says.
I made this one afternoon when I had fresh cherries sitting in the fridge and a chocolate bar that was begging to be shaved down. It wasn’t planned, it wasn’t fancy, it was just one of those “let’s see what happens” kitchen moments. And honestly? It turned into one of my favorite desserts along with Best Monkey Bread and Cranberry Orange Cookies.
Why You’ll Love This Ice Cream
- Real Cherries, Real Flavor: Fresh Bing cherries make every bite bright, fruity, and naturally sweet.
- Chocolate in Every Scoop: Shaved dark chocolate melts a little and hardens a little — the best combination.
- Creamy Like a Dream: Heavy cream gives it that perfect rich, velvety texture we all want.
- Made With Simple Ingredients: Eggs, sugar, milk — nothing complicated.
- Perfect for Summer: It tastes like a cold hug on a hot day.
- Everyone’s Favorite: Kids love it, adults love it, and you’ll love how quickly it disappears.
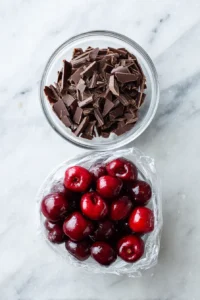
- 1/2 cup shaved chocolate Hershey’s Special Dark Chocolate Candy Bar
- 1/2 cup fresh Bing cherries halved and pitted
- 4 large eggs
- 1 1/2 cups granulated white sugar
- 4 cups heavy or whipping cream
- 2 cups milk
Mixing bowls
Saucepan
Whisk
Measuring cups
Thermometer
Ice cream maker
Spatula
Freezer-safe container
Refrigerate the shaved chocolate and cherries in separate bowls to keep them firm.
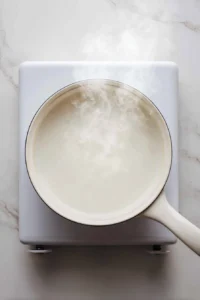
Warm the cream and milk together in a saucepan over medium-low heat.
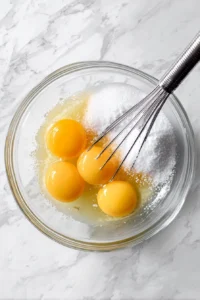
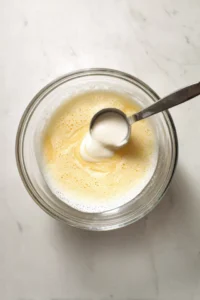
Whisk the eggs until light and fluffy, then mix in the sugar until smooth.
Slowly pour about one-third of the warm cream mixture into the egg mixture while whisking to temper it.
Add the remaining cream mixture, return everything to the saucepan, and heat gently until it reaches 175°F.
Chill the custard completely until it cools to about 40°F.
Pour the mixture into your ice cream maker and churn according to the machine’s instructions.
Add the chilled chocolate and cherries during the last minute of churning, then freeze until the texture is just right.
Tips That Make It Even Better
- Chill Everything: A cold base = smoother ice cream.
- Fresh Cherries Are Best, But canned works when cherries are out of season.
- Don’t Skip the Shaved Chocolate: It gives that signature Cherry Garcia look and texture.
- Let It Sit Before Scooping: Five minutes makes it scoop like store-bought.
- Add Extra Chocolate (Always): There’s no rule against it.
The Last Scoop
There’s something special about making your own ice cream — it slows you down in the best way. This Cherry Garcia version is sweet, creamy, and comforting without being fussy. Whether you’re making it for a weekend treat, a family gathering, or just because you had some cherries lying around, it’s the kind of recipe that makes life feel a little softer and a lot sweeter.
If you try it, save yourself the suspense — make a double batch.
Trust me, the first bowl disappears way too fast.
Variations & Easy Swaps (So It Never Gets Boring)
If you’re anything like me, you’ll make a recipe once and immediately start wondering how else you can tweak it. This ice cream is very forgiving.
- If fresh cherries aren’t in season, frozen cherries work beautifully — just thaw and pat them dry so they don’t water down the base.
- Dark chocolate is classic, but semi-sweet or milk chocolate works if you want a softer, sweeter bite.
- For extra depth, add a tiny splash of vanilla extract or almond extract to the custard — cherries love both.
- Want more texture? Stir in chopped chocolate chunks instead of shavings for bigger bites.
- If you prefer a lighter scoop, you can replace a small portion of the heavy cream with whole milk — it’ll still be creamy, just slightly softer.
- Feeling bold? A pinch of espresso powder in the base makes the chocolate flavor pop without tasting like coffee.
Storage & Leftovers (Ice Cream Reality Check)
Homemade ice cream doesn’t have preservatives, which means it’s best when it’s fresh — but it still stores well if you treat it right.
- Store the ice cream in an airtight container to prevent freezer burn and icy crystals.
- Press a piece of parchment paper or plastic wrap directly onto the surface before sealing — it really helps keep it smooth.
- Homemade ice cream is best within 5–7 days, when the texture is still creamy and scoopable.
- If it freezes too firm, let it sit on the counter for 5–10 minutes before scooping.
- Avoid repeated thawing and refreezing — that’s when the texture starts to suffer.
- Pro tip: smaller containers freeze and thaw more evenly than one giant tub.
FAQs
- Can I make this without an ice cream maker?
Yes, you can. The texture won’t be exactly the same, but freezing the base in a shallow dish and stirring every 30 minutes for a few hours still gives a creamy, scoopable result.
- Do I need to cook the cherries first?
Nope. Fresh cherries go in as they are. Cooking them changes the flavor and texture, and this recipe really shines with juicy, fresh bites.
- Why does my ice cream taste icy instead of creamy?
Usually that means the base wasn’t cold enough before churning, or it wasn’t stored airtight. Chilling the custard fully makes a big difference.
- Can I use store-bought chocolate chips instead of shaved chocolate?
You can, but shaved chocolate melts slightly and creates those delicate chocolate ribbons Cherry Garcia is known for.
- Is this ice cream overly sweet?
Not at all. The cherries add natural sweetness, and the dark chocolate balances everything nicely.
- Can I double the recipe?
Absolutely — just make sure your ice cream maker can handle the volume, or churn it in batches.


Leave a Reply