There are days when the world feels a little too loud, and on those days, I always end up in the kitchen looking for something warm. Last week, after a long, chilly walk home, I had this sudden urge for the kind of hot chocolate that reminds you of being a kid, simple, sweet, and comforting. No fancy tricks, no gourmet toppings, just the real thing.
So I pulled out my old saucepan and decided to make a Homemade Hot Chocolate Recipe that felt like home. Maybe it was the cold weather, or maybe it was nostalgia chasing me a bit, but the moment the cocoa hit the warm milk, I knew I was making more than a hot chocolate drink—I was making a warm memory.
I didn’t have a plan, didn’t measure perfectly, and spilled sugar twice (classic me), but somehow, this warm mug turned into one of the best things I’ve made all winter. You can even go for Christmas Yule Log or Chocolate Cream Pie for chocolatey and creamy celebrations.
Why I Keep Coming Back to It – Ethan’s Honest Take!
- Tastes Like Childhood: Every sip takes me back to sitting by the heater on winter evenings, watching holiday movies.
- Simple Pantry Ingredients: Cocoa, sugar, milk—things we already have. No store trips in the cold.
- Thick and Creamy: The half-and-half gives it that café-style richness without any extra effort.
- Quick Comfort: It comes together in minutes but feels like a slow hug.
- Budget-Friendly: No overpriced café drinks here—just warmth in a mug.
- Perfect for Sharing: Make a pot and suddenly the whole house gathers in the kitchen.
- Adjust-It-Your-Way: Sweeter? Darker? Creamier? You get to decide.
- Winter Mood Booster: Some days you don’t need motivation—you just need hot chocolate.
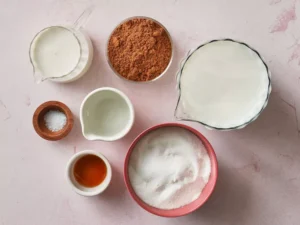
- ¾ cup white sugar or to taste
- ⅓ cup unsweetened cocoa powder
- 1 pinch salt
- ⅓ cup boiling water
- 3 ½ cups milk
- ¾ teaspoon vanilla extract
- ½ cup half-and-half cream
Gather all your ingredients and keep them ready.
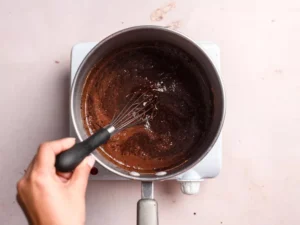
In a saucepan, mix sugar, cocoa powder, and salt. Add the boiling water and whisk until the mixture becomes smooth. Let it come to a gentle simmer, stirring constantly so it doesn’t scorch, and cook for about 2 minutes until slightly thickened.
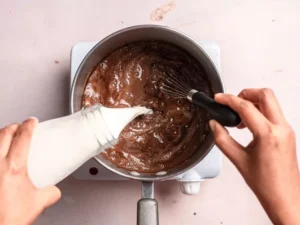
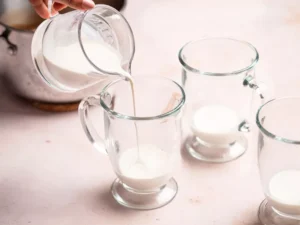
Pour in the milk and continue heating until the cocoa is very hot, but do not let it boil.
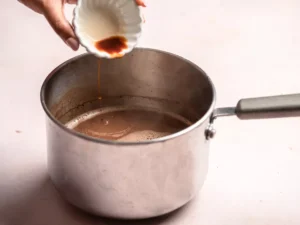
Remove the pan from the heat and stir in the vanilla for a soft, rounded flavor.
Add a splash of cream to each mug to cool the cocoa slightly, then ladle the hot cocoa into the mugs.
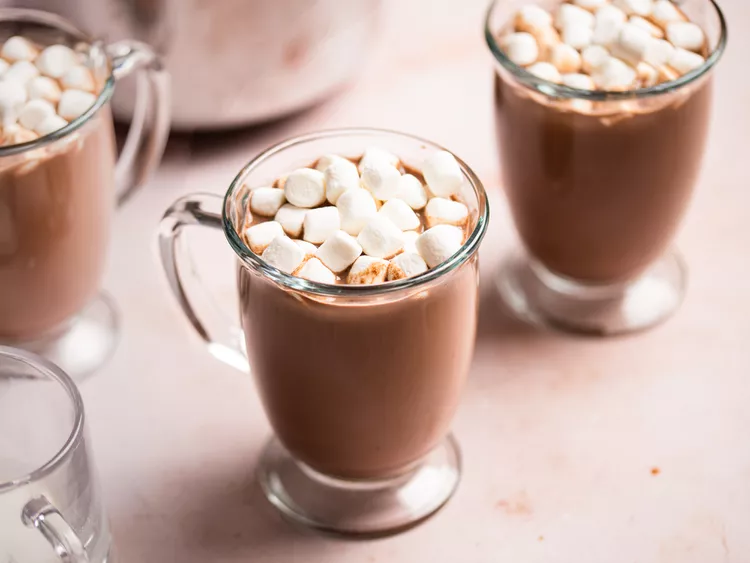
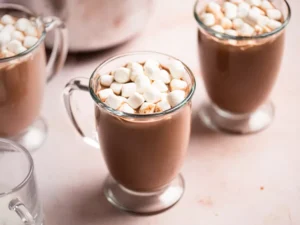
Serve warm and enjoy your cozy drink!
Real-Life Cooking Notes from Ethan
- Cocoa First, Milk Later: I used to dump everything into the pot at once—big mistake. Mix the cocoa, sugar, and boiling water first so the chocolate actually dissolves.
- Don’t Skip the Pinch of Salt: It’s tiny but mighty. It wakes up the chocolate flavor in a big way.
- Stir, Stir, Stir: If you walk away for even a minute, the bottom will catch. Trust me… I’ve scrubbed enough pots to know.
- Add Milk Slowly: Pouring all the milk at once cools the mixture too fast. Add it in little waves.
- Vanilla at the End: If you add it early, the flavor disappears. Add it right before serving—instant magic.
- Half-and-Half = Creamy Dreamy: Even a small amount transforms the whole drink. Don’t substitute if you don’t have to.
- Taste as You Go: Everyone’s chocolate comfort level is different. Start with the given sugar, then adjust.
- Don’t Let It Boil: Once milk boils, the texture changes and the flavor gets a little “cooked.” Gentle heat is your friend.
Storage and Leftover Handling Tips
- Refrigerate for up to 2 Days: Store in a sealed jar or container.
- Reheat Gently: Use low heat on the stove to avoid curdling the milk.
- Add Milk if Too Thick: A splash will bring it back to sipping consistency.
- Shake Before Reheating: Ingredients may settle—just give it a shake or stir.
- Freeze into Cubes: Pour into ice trays for instant hot chocolate starters later.
- Add Fresh Vanilla When Reheating: Keeps the flavor bright.
FAQ
- Can I make this dairy-free?
Yes—use almond or oat milk and skip the half-and-half.
- Can I use dark cocoa powder?
Absolutely, it gives a deeper, richer flavor.
- Can I reduce the sugar?
Yes, start with half and adjust after tasting.
- Can I add toppings?
Marshmallows, whipped cream, cinnamon—go wild.
- Can kids drink this?
Yes, it’s kid-friendly and safe.
- Why shouldn’t I boil it?
Boiling can cause the milk to separate or form a skin.
- How do I make it extra thick?
Use more half-and-half or simmer a few extra minutes.
- Can I make this for a crowd?
Just double or triple the recipe—works perfectly.
The Last Sip
If this cup of homemade hot chocolate doesn’t warm you from the inside out, make it again tomorrow. Second tries are kind of my thing anyway.
Sometimes all you need is a warm mug between your hands and a quiet moment in the kitchen to feel like everything’s going to be okay.


Leave a Reply