It started with a lazy Sunday and a few apples sitting in my fruit bowl, looking way past their prime. I wasn’t planning to bake anything fancy — honestly, I just wanted my kitchen to smell like cinnamon and butter.
That’s usually how my best dishes happen, not from planning, but from a “what if I try this?” moment.
So I grabbed some store-bought pie crust (because I’m not out here trying to win awards), sliced up the apples, and tossed them with sugar and cinnamon. An hour later, I had an apple pie that looked rustic, smelled heavenly, and tasted like home.
That was it, my “easy apple pie” moment. The one that made me realize baking doesn’t need to be intimidating. You just need a little butter, a little faith, and maybe an oven that behaves.
Why I Keep Coming Back to It – Ethan’s Honest Take
- The Smell That Starts It All: The mix of apples and cinnamon baking together makes the house feel warm, like a hug you can smell.
- The Shortcut Win: Store-bought pie crust is my secret weapon. No rolling pin stress, no flour mess just unwrap, fill, and bake.
- The Apple Truth: I’ve tried fancy varieties, but any crisp apple works. It’s about heart, not horticulture.
- The Sweet Spot: Not too sugary, not too tart — just the kind of balance that makes you want one more forkful.
- The Comfort Factor: This pie has seen me through long weeks, cold nights, and slow Sundays. It never fails to lift the mood.
- The Lazy Baker’s Dream: It’s simple enough to pull off without sweating over measurements or technique.
- The Shareable Magic: Whether it’s friends dropping by or family at the table, everyone loves a warm slice of apple pie.
- The Little Victory: Every time I pull one from the oven, I think — “Hey, maybe I am getting the hang of this cooking thing.”
Real-Life Cooking Notes from Ethan
- Start with Cold Crusts: Keep your pie crusts in the fridge until you’re ready to use them. Cold dough = flakier, happier crust.
- Slice ‘Em Thin: Thin apple slices cook evenly and soak up all that sugary cinnamon goodness. Thick slices can end up crunchy in the middle.
- Sugar Check: Start with ¾ cup of sugar, but taste your apples first. If they’re tart, add a little extra. If they’re sweet, pull back.
- Cinnamon is the Soul: That one teaspoon might seem small, but it’s what makes the pie smell like fall. Don’t skip it.
- Butter Makes It Better: Dot the top of your apple filling with a few pieces of butter before closing it up with the top crust — it melts right into the filling and gives every bite richness.
- Egg Wash Trick: Mix one egg with a tablespoon of water and brush it over the top crust. It gives you that golden, glossy bakery finish.
- Crust Cuts Count: Cut small slits on the top crust before baking so steam can escape — otherwise, you’ll end up with apple soup instead of apple pie.
- Cool It (Seriously): Let the pie rest for at least 30 minutes before cutting. The filling sets and the slices hold together beautifully.
- 1 14.1 ounce package pastry for a 9-inch double-crust pie
- ¾ cup white sugar or more to taste
- 1 teaspoon ground cinnamon
- 6 cups thinly sliced apples
- 1 tablespoon butter
- 1 egg optional
- 1 tablespoon water optional
9-inch pie dish
Mixing bowls
Whisk or fork (for egg wash)
Pastry brush
Knife (for slicing apples and cutting slits)
Measuring cups and spoons
Oven mitts
Preheat the oven to 450°F (230°C).
Line a 9-inch pie dish with one pastry crust and set the second crust aside.
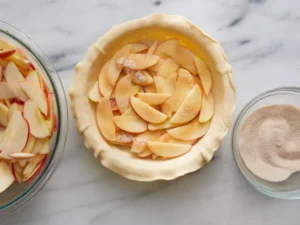
In a small bowl, mix sugar and cinnamon. Add extra sugar if your apples are tart.
Layer the apple slices in the pie crust, sprinkling each layer with the cinnamon-sugar mixture.
Dot the top layer with small pieces of butter.
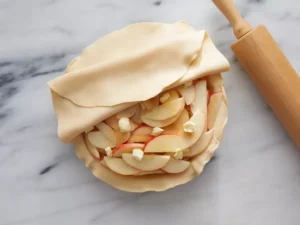
Cover with the second crust, sealing the edges by fluting them.
Beat the egg with 1 tablespoon of water to make an egg wash, then brush it over the top crust.
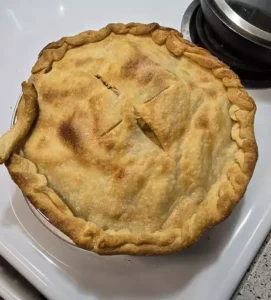
Cut slits on top to allow steam to escape.
Bake on the lowest rack for 10 minutes. Reduce the oven temperature to 350°F (175°C) and bake for another 30–35 minutes until golden and bubbly.
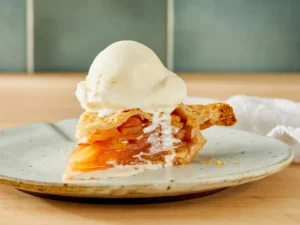
Let cool slightly before serving warm or cold.
The Last Bite
Every time I make this pie, it reminds me that comfort doesn’t have to be complicated. It’s a little messy, a little sweet, and perfectly imperfect — kind of like life itself.
So if you’ve got a few apples lying around and an hour to spare, give this one a go. Worst case? You’ll end up with a warm pie and a kitchen that smells like happiness.
If this pie doesn’t fix your mood, bake it again tomorrow — I probably will.
Easy Variations & Simple Upgrades
- Brown Sugar Swap: Replace half the white sugar with brown sugar for deeper, caramel-like flavor.
- Spice Boost: Add a pinch of nutmeg or allspice if you want extra fall warmth.
- Lemon Lift: A teaspoon of lemon juice brightens the apples and balances the sweetness.
- Crumb Topping Option: Skip the top crust and sprinkle on a buttery streusel for apple-crisp vibes.
- Caramel Drizzle: A light drizzle after baking takes this straight into dessert-table star territory.
- Apple Mix: Combine sweet and tart apples for extra depth without extra effort.
- Vanilla Finish: A splash of vanilla extract in the filling adds subtle bakery-style flavor.
Desserts You Should Not Miss!
- Fudge Recipe
- Christmas Figgy Pudding
- Christmas Trash
- Cake Mix Cookies
- Peppermint Patties
How to Store, Reheat & Make Ahead
- Room Temperature Storage: Once completely cooled, loosely cover the pie and keep it at room temperature for up to 24 hours.
- Refrigerator Option: Store covered in the fridge for up to 4 days if you want to stretch it out a bit longer.
- Best Reheat Method: Warm slices in a 325°F oven for 10–15 minutes to revive the crust without drying it out.
- Microwave Shortcut: Heat individual slices in short bursts just enough to warm the filling without turning the crust soft.
- Make-Ahead Friendly: You can assemble the entire pie, cover it tightly, and refrigerate it up to one day before baking.
- Freeze It Unbaked: Wrap tightly and freeze for up to 2 months. Bake straight from frozen, adding 15–20 minutes.
- Next-Day Bonus: Apple pie somehow tastes even cozier the day after, especially with coffee.
Apple Pie FAQs
- Why is my pie watery?: Apples release juice as they bake, thin slices and proper venting help prevent soup.
- Do I need to pre-cook the apples?: Not for this recipe, keeping it simple is the whole point.
- Should I peel the apples?: Yes, for smoother texture, but leaving skins on works for a rustic feel.
- Why chill the crust?: Cold dough melts more slowly, which creates flaky layers instead of a soggy crust.
- Can I use frozen apples?: Fresh is best, but frozen can work if thawed and drained well.
- How do I know it’s done?: The filling should bubble through the vents, and the crust should be golden.
- Is it okay if it’s messy?: Absolutely, rustic is part of the charm.


Leave a Reply