Get this recipe sent to your inbox, plus
new home-style recipes from An Amateur Cook every week.
I didn’t wake up one morning dreaming about cake pops. Honestly, I woke up staring at a half-used box of strawberry cake mix left over from a birthday that never happened. It was one of those quiet afternoons where the sky couldn’t decide if it wanted to rain, and I couldn’t decide if I wanted a nap or something sweet.
Cake felt like too much commitment. Cookies felt boring. Then I remembered cake pops. Those tiny treats you always see at parties, looking cute and put-together, like they have their life figured out. I very much did not. But I figured, what’s the worst that could happen? I already mess up regular cakes sometimes. How much worse could smaller cake be?
Turns out, these strawberry cake pops didn’t just work, they saved the day. Pink, sweet, a little messy, and honestly kind of joyful to make. I’ve been coming back to them ever since, especially when I need a reminder that food doesn’t have to be perfect to be fun.
Table of Contents
Why I Can’t Stop Making These Cake Pops
Small Treat, Big Joy: There’s something magical about holding dessert on a stick. It feels playful, like dessert decided not to take itself too seriously.
Hard to Mess Up: Even when my cake crumbled unevenly or my coating looked a little lumpy, they still tasted amazing. That’s my kind of recipe.
Instant Mood Booster: Pink food just does something to the brain. These make bad days feel lighter.
Perfect for Sharing: You don’t need plates or forks or excuses. You just hand one over and watch someone smile.
No Fancy Skills Needed: If you can crumble cake and roll a ball, you’re qualified. No chef hat required.
Customizable Energy: Sprinkles, colors, coatings. You can change them every time and never get bored.
Great Make-Ahead Dessert: I can make these when I have energy and enjoy them later when I don’t.
Tips I Learned the Hard Way (So You Don’t Have To)
Cool the Cake Completely: Warm cake turns into sticky chaos. I tried rushing once and immediately regretted my life choices.
Go Easy on the Frosting: Two tablespoons feels small, but it’s enough. Too much frosting makes the pops greasy and hard to dip.
Use Your Hands: Mixing with a spoon doesn’t quite cut it. Hands get the job done faster and somehow feel more honest.
Chill Before Dipping: Cold cake balls behave better. Warm ones slide off the stick like they’re escaping.
Tap, Don’t Shake: When dipping, gently tap off extra chocolate. Shaking leads to cracks and heartbreak.
Work in Batches: Don’t melt all the coating at once if your kitchen is warm. It thickens fast and gets grumpy.
Sprinkles First, Questions Later: Add sprinkles immediately. If you hesitate, the coating sets and refuses to cooperate.
Accept Imperfection: Some will be prettier than others. Eat the ugly ones yourself. That’s the rule.
How to Make These Cake Pops?
Ingredients
1 package strawberry cake mix
1 cup water
1/2 cup vegetable or canola oil
3 large eggs
2 tablespoons canned white vanilla or cream cheese frosting
20 ounces vanilla melting chocolate or almond bark
Pink or red food coloring gel
Valentine’s Day sprinkles
Equipment
9×13-inch baking pan
Mixing bowls (large and medium)
Fork or hand mixer
Measuring cups
Parchment paper
Baking sheet
Microwave-safe bowls
Spoon or spatula
Cake pop sticks
Foam block, jar, or egg carton (for setting cake pops)
Instructions
Prepare the strawberry cake mix with water, oil, and eggs as directed on the package. Bake in a 9×13-inch pan and let cool completely.
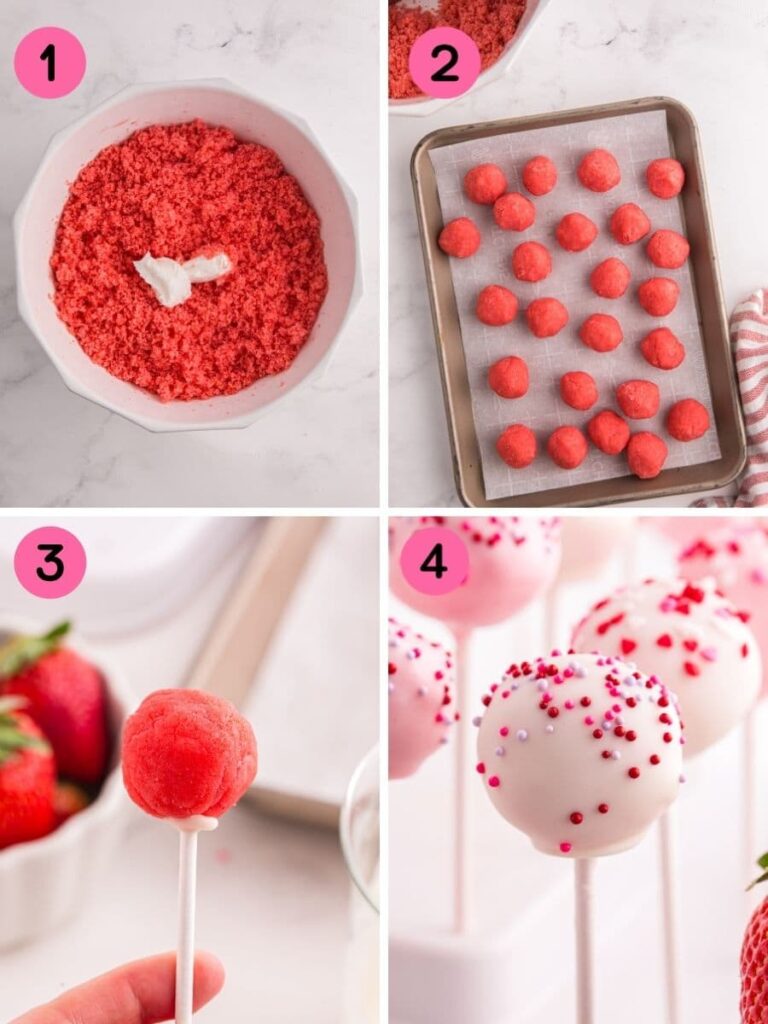
Crumble the cooled cake into a large bowl until fine crumbs form.
Add the frosting and mix until the mixture holds together and can be shaped easily.
Roll into 1-inch balls and place on a parchment-lined baking sheet.
Melt a small amount of vanilla melting chocolate. Dip the tip of each cake pop stick into the chocolate, then insert it halfway into a cake ball.
Refrigerate the cake pops for 1 hour to set.
Melt the remaining chocolate and divide into two bowls. Tint one bowl pink or red if desired.
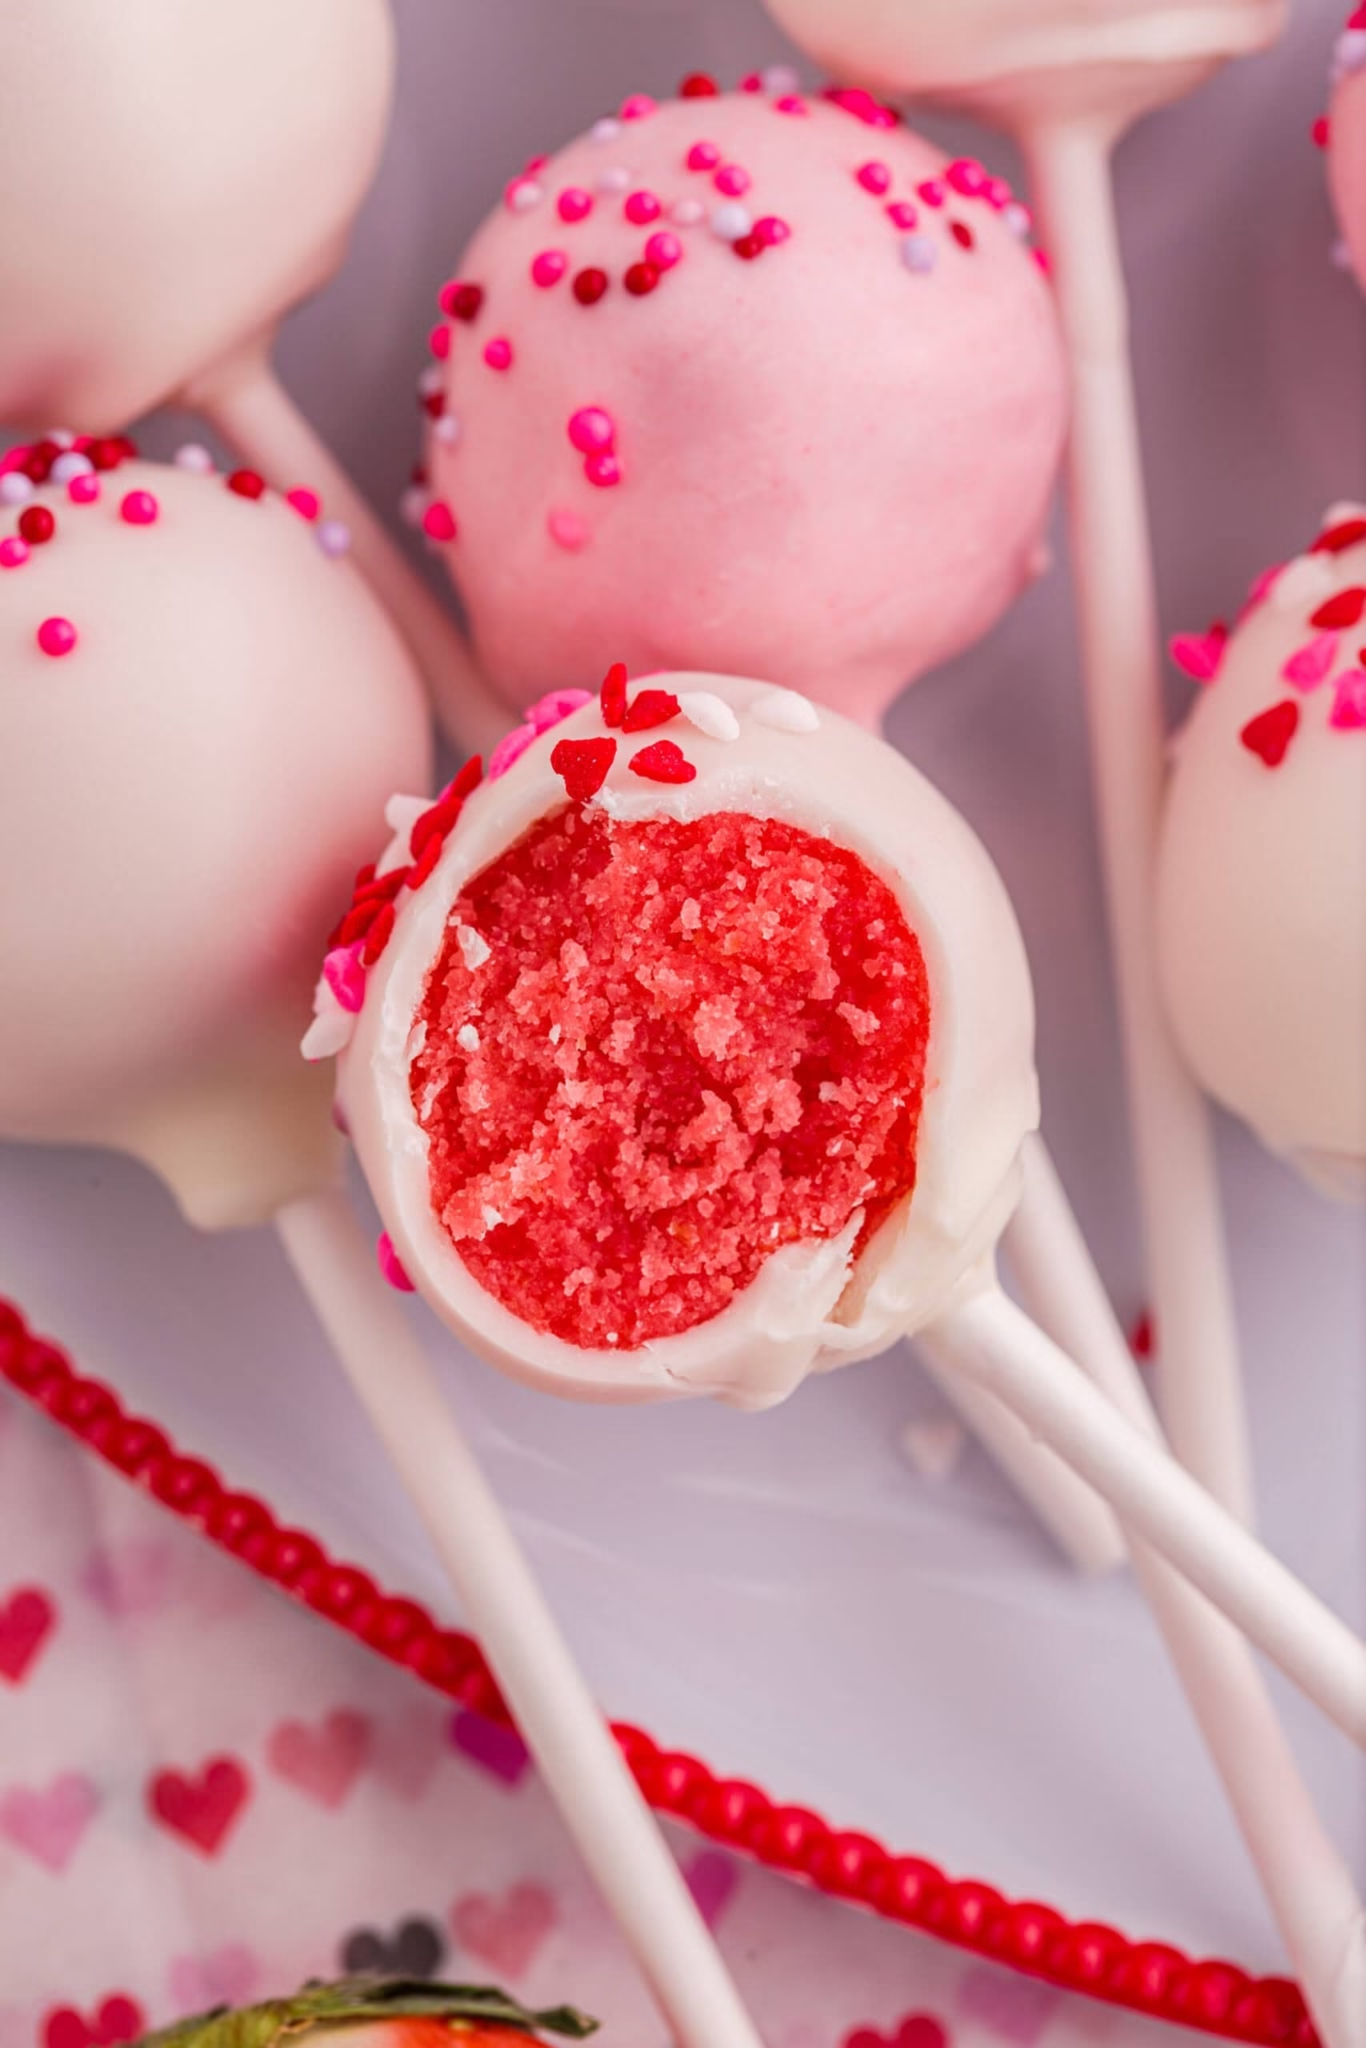
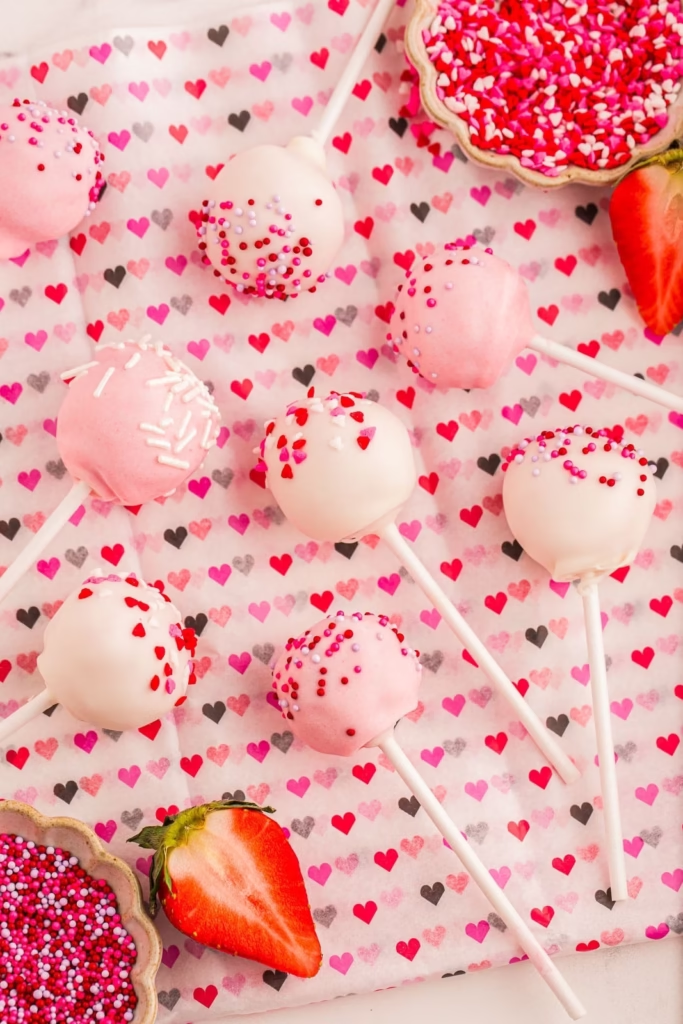
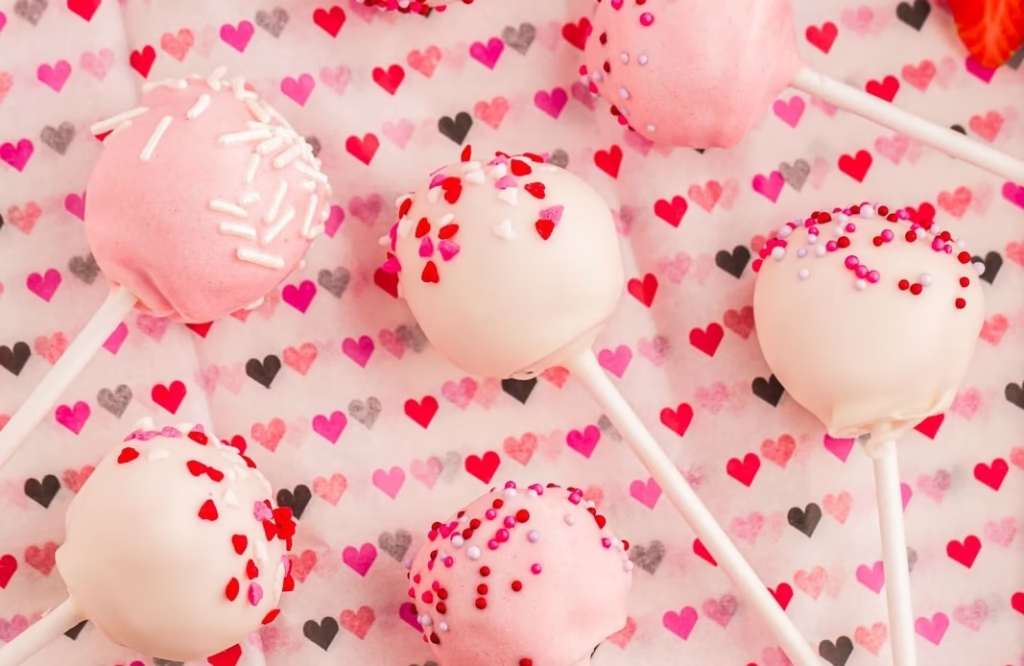
Dip each cake pop into the melted chocolate, gently tapping off excess. Add sprinkles immediately.
Stand the cake pops upright and allow the coating to fully harden. Chill until ready to serve.
Strawberry Cake Pops Recipe
Soft strawberry cake mixed with frosting, dipped in vanilla chocolate, and decorated for a sweet, festive treat.
2tablespoonscanned white vanillaor cream cheese frosting
20ouncesvanilla melting chocolate or almond bark
Pink or red food coloring gel
Valentine’s Day sprinkles
Equipment
9×13-inch baking pan
Mixing bowls (large and medium)
Fork or hand mixer
Measuring cups
Parchment paper
Baking sheet
Microwave-safe bowls
Spoon or spatula
Cake pop sticks
Foam block, jar, or egg carton (for setting cake pops)
Method
Prepare the strawberry cake mix with water, oil, and eggs as directed on the package. Bake in a 9×13-inch pan and let cool completely.
Crumble the cooled cake into a large bowl until fine crumbs form.
Add the frosting and mix until the mixture holds together and can be shaped easily.
Roll into 1-inch balls and place on a parchment-lined baking sheet.
Melt a small amount of vanilla melting chocolate. Dip the tip of each cake pop stick into the chocolate, then insert it halfway into a cake ball.
Refrigerate the cake pops for 1 hour to set.
Melt the remaining chocolate and divide into two bowls. Tint one bowl pink or red if desired.
Dip each cake pop into the melted chocolate, gently tapping off excess. Add sprinkles immediately.
Stand the cake pops upright and allow the coating to fully harden. Chill until ready to serve.
Nutritional Information
Nutrition
Value
Calories
230 kcal
Carbohydrates
30 gm
Fat
11 gm
Protein
3 gm
Variations You’ll Have Fun Trying
Chocolate Strawberry Pops: Swap vanilla coating for chocolate and suddenly it feels very grown-up and fancy.
Cream Cheese Core: Roll a tiny cream cheese ball and hide it inside the cake. Surprise wins every time.
White Chocolate Drizzle: Drizzle melted white chocolate over pink coating for a bakery-style look with minimal effort.
Berry Swap: Use vanilla cake and mix in strawberry jam instead. Different vibe, same happiness.
Holiday Colors: Red and white for Valentine’s Day, pastels for spring, or whatever color fits your mood.
Crunchy Coating: Add crushed cookies or nuts over the coating before it sets for texture.
Mini Cake Pops: Make them smaller for bite-sized treats that disappear way too fast.
How I Like to Serve These Cake Pops
Straight from the Fridge: Cold cake pops hit differently. Firm, creamy, and refreshing.
On a Dessert Board: I stick them in jars or foam blocks and let people grab as they please.
With Coffee or Tea: Sweet strawberry pairs surprisingly well with a bitter drink. Balance matters.
As Party Favors: Wrap them individually and suddenly you look like someone who plans ahead.
Late-Night Treat: One cake pop after dinner feels indulgent without going overboard.
Kid and Adult Approved: I’ve yet to meet someone who says no to these.
Storage and Leftover Tips from My Kitchen
Fridge Friendly: Store them in an airtight container for up to a week. They hold up beautifully.
Freeze for Later: You can freeze undecorated cake balls for up to a month. Thaw, dip, decorate. Easy win.
Avoid Heat: Warm rooms make the coating sweat. Learned that one the sticky way.
Layer Carefully: If stacking, use parchment between layers to avoid smudges.
Travel Tip: Transport them chilled. They behave better when they’re cold and calm.
Leftover Coating Hack: Pour extra melted coating onto parchment, let it set, and save for later melting.
Frequently Asked Questions
Can I use homemade strawberry cake instead of a box mix?: Absolutely. If you love baking from scratch, go for it. The box mix just keeps things simple.
Why did my cake pops crack after dipping?: Usually temperature shock. Cold pops and overly hot coating don’t get along. Let the coating cool slightly.
Do I really need a cake pop stick?: Technically no, but it makes life easier and less sticky. Worth it.
Can I make these ahead for a party?: Yes, and you should. They actually taste better chilled and rested.
What if my coating is too thick?: Add a tiny bit of vegetable oil and stir. It loosens things up fast.
Can kids help with this recipe?: Definitely. Rolling and decorating are kid gold. Just supervise the melting.
Why did my pops fall off the stick?: Either they weren’t chilled enough or the stick wasn’t dipped in coating first. That step matters.
Can I skip food coloring?: Of course. They’ll still taste great. Color is just extra fun, not a requirement.


Leave a Reply