I made peppermint bark for the first time after a pretty chaotic holiday shopping trip. You know the kind where you leave the house full of cheer and come back wondering why you thought it was a good idea in the first place.
I came home tired, hungry, and craving something sweet but not complicated. I opened my pantry, saw a forgotten box of peppermint candies, and the idea hit me. What if I melt some chocolate, crush these candies, and call it dessert?
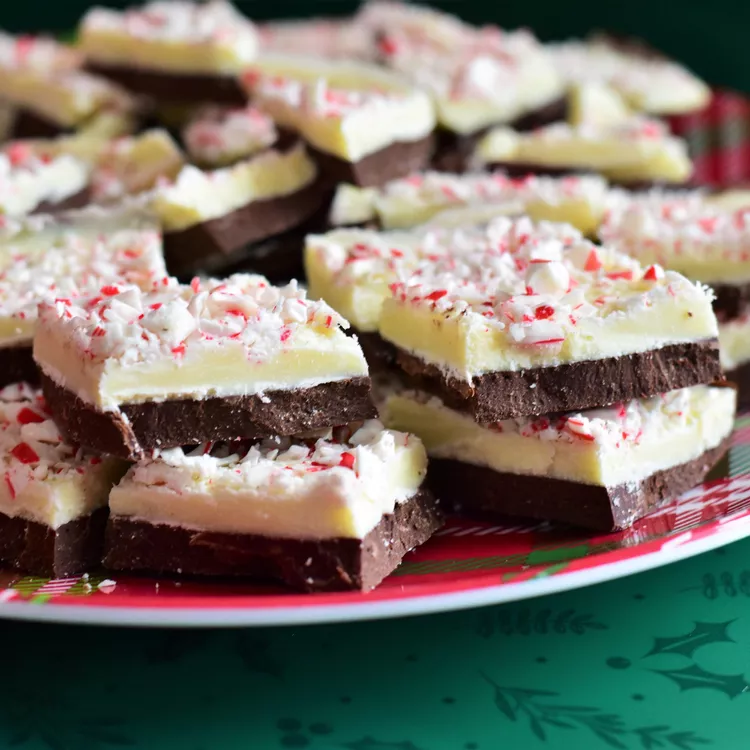
That first batch was far from pretty. I didn’t crush the candies properly, so some pieces were huge and nearly cracked a tooth. The chocolate layers were uneven and slightly crooked.
But when I took a bite, I didn’t care. It tasted like the best parts of December, cool peppermint and smooth chocolate. Since then, peppermint bark has become the thing I make when I want something festive without going through a whole production.
Why I Keep Coming Back to It, Ethan’s Honest Take
- Instant Holiday Mood: One bite and it feels like someone turned on Christmas lights inside my brain.
- Ridiculously Easy: Melt, spread, chill, done. Even on my laziest days, I can manage this.
- Perfect Edible Gift: People think you put in way more effort than you actually did.
- No Oven Needed: Great for days when turning on the oven feels like too much.
- Kid Friendly Fun: Crushing peppermint candies is weirdly satisfying.
- Stays Fresh for Weeks: I can make a batch and snack on it slowly if I pretend to have self-control.
- Great for Parties: A plate of peppermint bark disappears faster than any fancy dessert I’ve made.
- Holiday Smell: Mint and chocolate together always feel comforting.
Real Life Cooking Notes from Ethan
- Use Good Chocolate: The flavor really depends on the chocolate, so pick one you enjoy eating on its own.
- Crush Carefully: Put the candies in a zip bag and crush with a rolling pin. Too fine and they melt, too chunky and they break teeth.
- Line Your Tray: Parchment makes lifting the bark so much easier. I learned this after scraping chocolate off a pan one December night.
- Do Not Rush the Cooling: Let the first chocolate layer set completely before adding the white chocolate. If not, the layers mix together.
- Add Peppermint Extract Lightly: A little goes a long way. Too much and it tastes like toothpaste.
- Avoid Overheating: Melt chocolate slowly. Burnt chocolate smells terrible and ruins the whole batch.
- Press the Toppings Gently: Sprinkle the crushed candies right after spreading the chocolate so they stick.
- Break it by Hand: You get those pretty, rustic pieces that look way nicer than using a knife.
- 8 ounces high-quality semisweet chocolate broken into pieces
- 2 teaspoons canola oil divided
- ½ teaspoon peppermint extract divided
- 8 ounces high-quality white chocolate broken into pieces
- 25 peppermint candies crushed, divided
Prep the Pan: Lightly grease a 9-inch square pan and line it with waxed paper.
Melt Dark Chocolate: Melt semisweet chocolate with 1 teaspoon canola oil over a double boiler, stirring until smooth.
Add Peppermint: Remove from heat and stir in ¼ teaspoon peppermint extract.
Create Bottom Layer: Spread melted chocolate evenly in the pan and top with half the crushed candy; refrigerate for 1 hour to harden.
Melt White Chocolate: Melt white chocolate with remaining 1 teaspoon oil over a double boiler, stirring until smooth.
Add Peppermint: Remove from heat and stir in the remaining ¼ teaspoon peppermint extract.
Add Top Layer: Pour white chocolate over the hardened layer, spread evenly, and sprinkle with remaining crushed candy; refrigerate 1 hour.
Serve: Remove from the pan and break into pieces to serve.
Fun Variations When You Want to Change It Up
- Dark Chocolate Only: Extra rich, less sweet.
- Triple Chocolate: Dark, milk, and white layers.
- Sprinkle Swap: Use crushed candy canes, Andes mints, or chocolate chips.
- Drizzle Finish: Add melted dark chocolate on top for contrast.
- Extra Minty: One drop (and only one) extra peppermint extract in the white chocolate.
How do I Serve Peppermint Bark?
- On a holiday dessert board
- Wrapped in cellophane for gifting
- Chopped and sprinkled over ice cream
- Crumbled over brownies or cupcakes
Storage & Make-Ahead Tips
- Room Temperature: Store in an airtight container for up to 2 weeks.
- Refrigerator: Keeps even longer, especially in warmer climates.
- Layer with Parchment: Prevents sticking.
- Avoid Heat: Chocolate blooms if it gets too warm.
- Freezer Friendly: Freeze for up to 2 months; thaw before serving.
Holiday Gifting Notes (Because This Is a Star Gift)
- Break into irregular pieces for a homemade look
- Wrap in parchment + ribbon
- Add a handwritten tag people love that
- Pair with a mug or cocoa mix for a full gift
This is my “I didn’t have time but still care” present.
FAQs
- Why did my layers mix together?
The first layer wasn’t fully set before adding the next.
- Can I skip peppermint extract?
Yes — crushed candies alone give great flavor.
- Why is my chocolate grainy?
It overheated. Melt slowly and gently.
- Can kids help make this?
Absolutely — especially the candy-crushing part.
- Does peppermint bark need refrigeration?
Not required, but helpful in warmer homes.
The Last Bite
Make this when the holiday season feels a little too busy and you need something simple and sweet. If this peppermint bark doesn’t lift your spirits, make another tray. It works for me every time.


Leave a Reply