Get this recipe sent to your inbox, plus
new home-style recipes from An Amateur Cook every week.
I didn’t grow up eating anything called “dirt dessert,” but if you’d told my 8-year-old self that one day I’d be making pudding topped with crushed cookies and gummy worms on purpose, I would’ve been very into it.
This one started on a rainy afternoon when I had a serious chocolate craving and zero motivation to bake anything complicated. I opened the pantry, saw a pack of Oreos staring back at me, and then spotted gummy worms I definitely didn’t remember buying. It felt like a sign. Not a serious one, just a fun one.
I’d seen versions of this dessert before, usually at birthday parties or potlucks, always surrounded by kids who were way more excited than the adults. But that day, I thought, why not make it from scratch and actually enjoy the process? Worst case, I end up with chocolate pudding and cookies. Not exactly a loss.
So I tried it. Messed up the pudding a little the first time. Ate it anyway. Tried again the next day. And now… I keep coming back to it more often than I probably should admit.
Table of Contents
Why I Cannot Stop Making This
Pure Comfort: There’s something about chocolate pudding that just settles everything down. Bad day, weird mood, random craving… this fixes a lot of it.
No Pressure Cooking: This isn’t one of those recipes where everything has to be perfect. It actually looks better when it’s a little messy.
Childhood Energy: The gummy worms on top make me smile every single time. It feels playful, and honestly, we don’t do enough of that as adults.
Chocolate Fix Done Right: It’s rich without being too heavy, and it hits that chocolate craving without needing a full cake situation.
Make-Ahead Friendly: I love that I can make it, stick it in the fridge, and forget about it until I’m ready to eat.
Customizable Layers: Some days I go heavy on Oreos, some days more pudding. There’s no wrong answer here.
Crowd-Pleaser Without Trying: People get weirdly excited about this. You don’t even have to sell it.
It’s Kind of Fun to Make: Crushing Oreos is oddly therapeutic. Highly recommend.
Ingredients You’ll Need
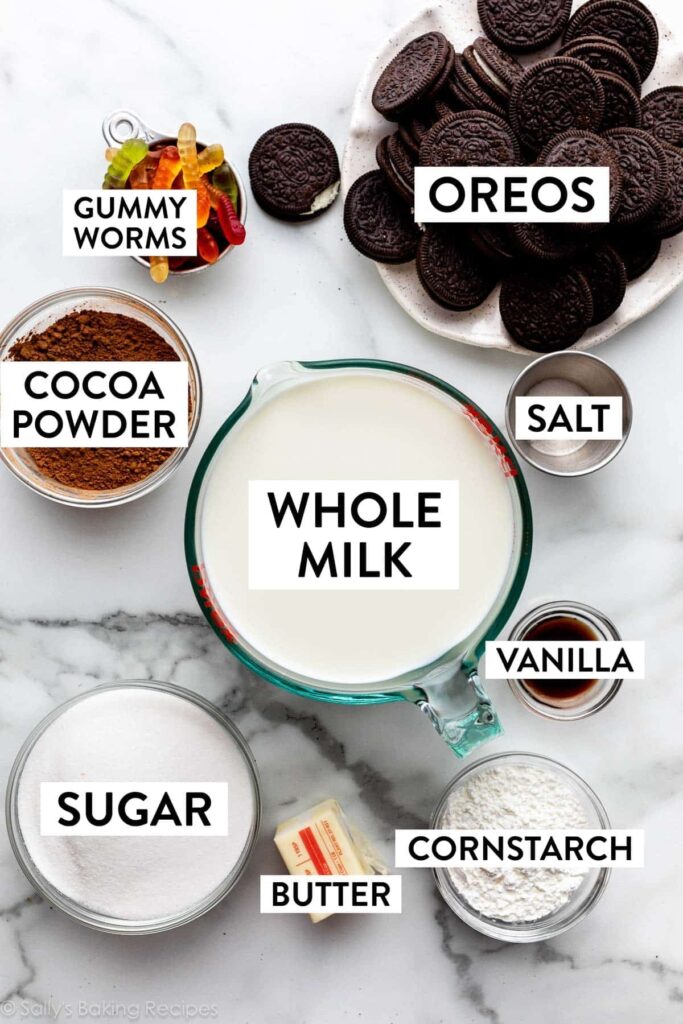
Granulated sugar: 1 and 1/3 cups
Cocoa powder: 1/2 cup
Cornstarch: 1/3 cup
Salt: 1/4 teaspoon
Whole milk: 4 and 1/2 cups
Unsalted butter: 3 tablespoons, softened
Vanilla extract: 2 teaspoons
Oreo cookies: 24–30 cookies
Gummy worms: 24 pieces
A Quick Heads-Up Before You Start
This pudding takes a little patience. I’ve tried rushing it before by turning up the heat, and all I got was weird, lumpy chocolate sadness. Keep it steady, keep whisking, and trust the process.
What I Learned the Hard Way
Don’t skip the plastic wrap step on the pudding. That weird skin on top? Yeah, I’ve made that mistake so you don’t have to.
Instructions
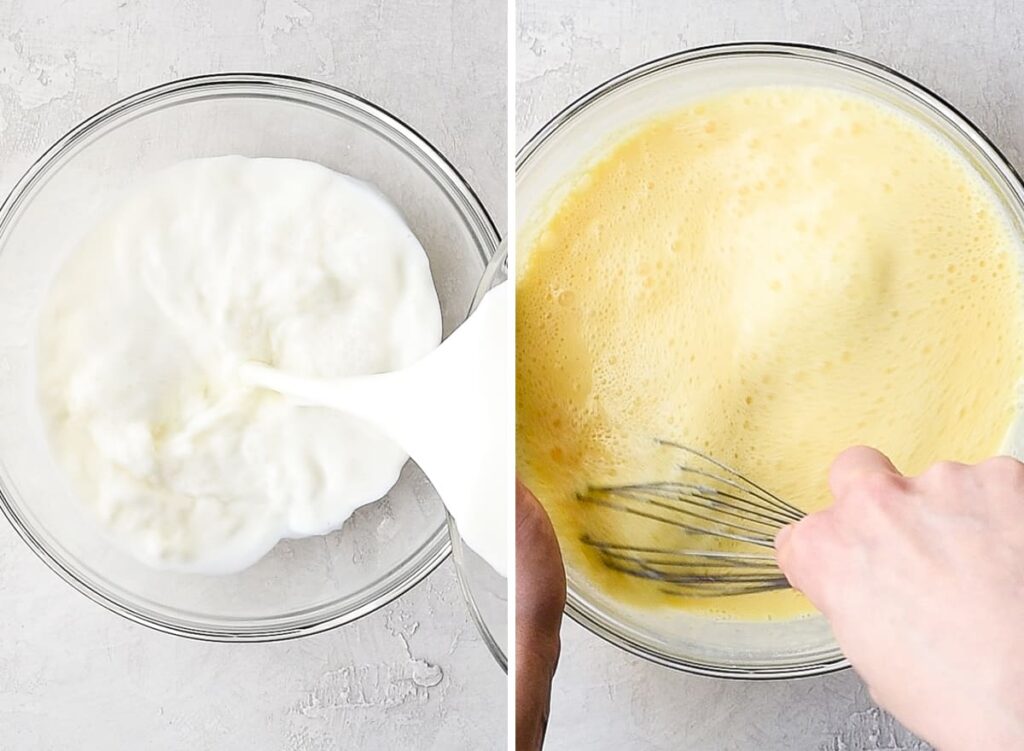
Make the pudding: In a saucepan, whisk together sugar, cocoa powder, cornstarch, and salt. Slowly add milk while whisking.
Cook it patiently: Place over medium heat and bring to a boil while whisking occasionally. This takes about 10 minutes.
Watch for bubbles: Once it bubbles in the center, whisk constantly for 1 minute until thick.
Finish it off: Remove from heat and stir in butter and vanilla.
Cool slightly: Let sit for 5 minutes, then cover with plastic wrap directly on the surface. Refrigerate for 1 hour.
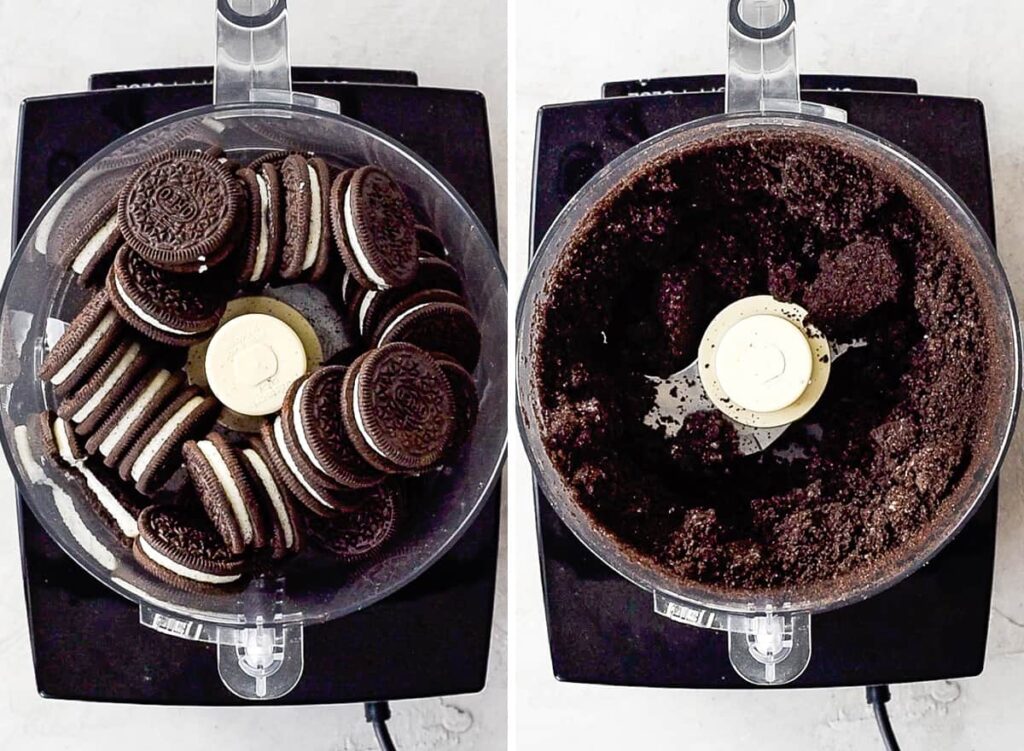
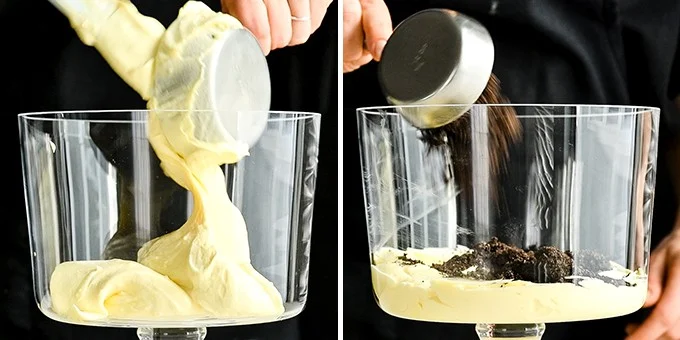
Crush the Oreos: Use a blender or food processor to make crumbs.
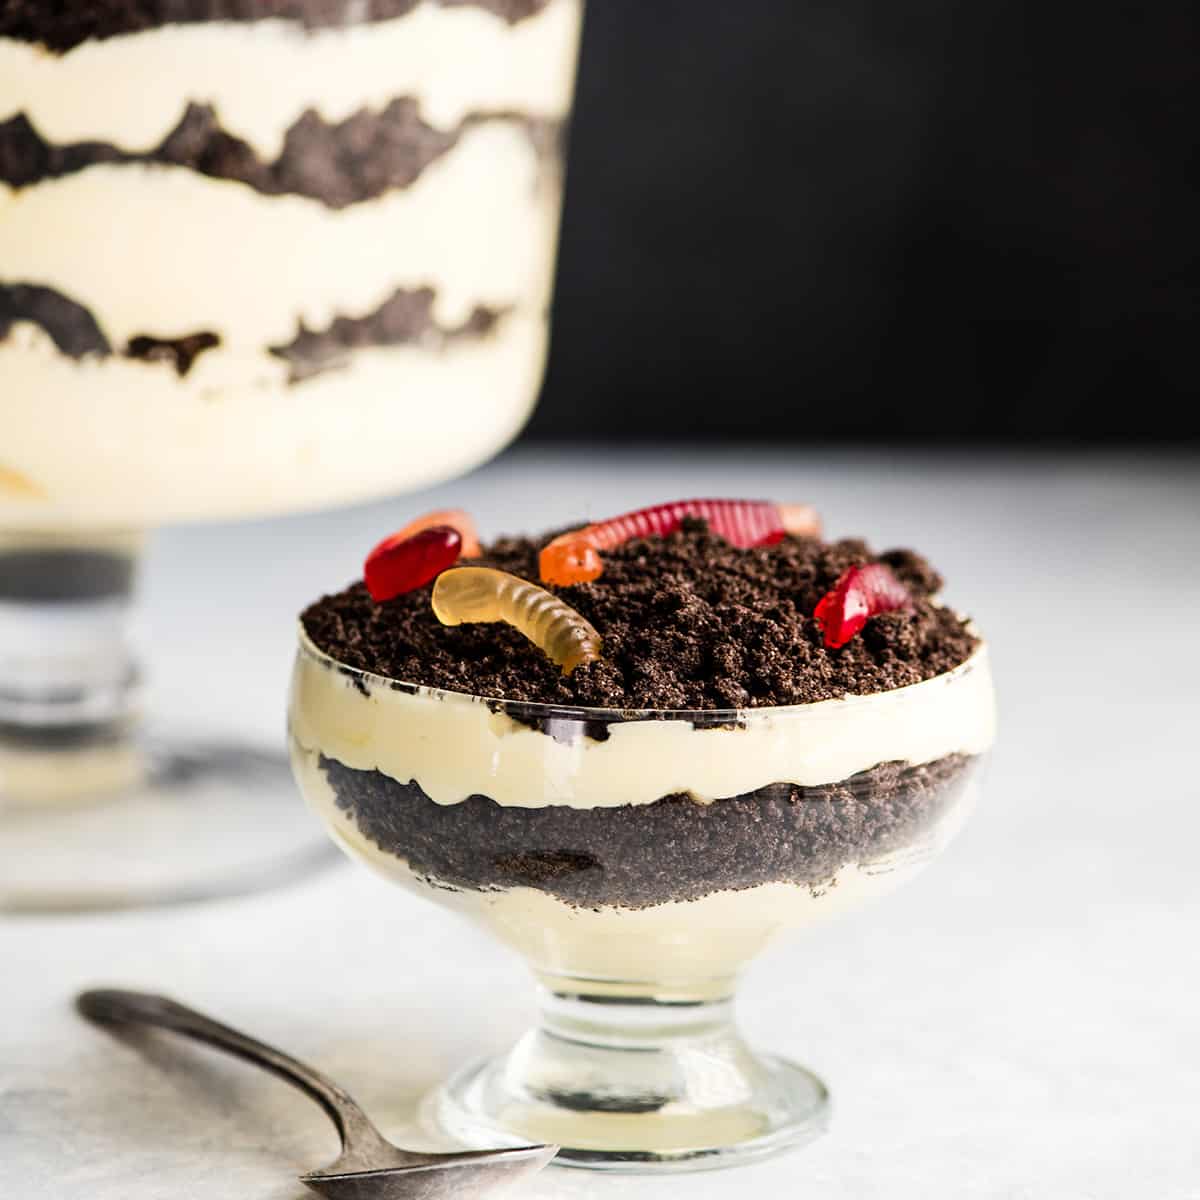
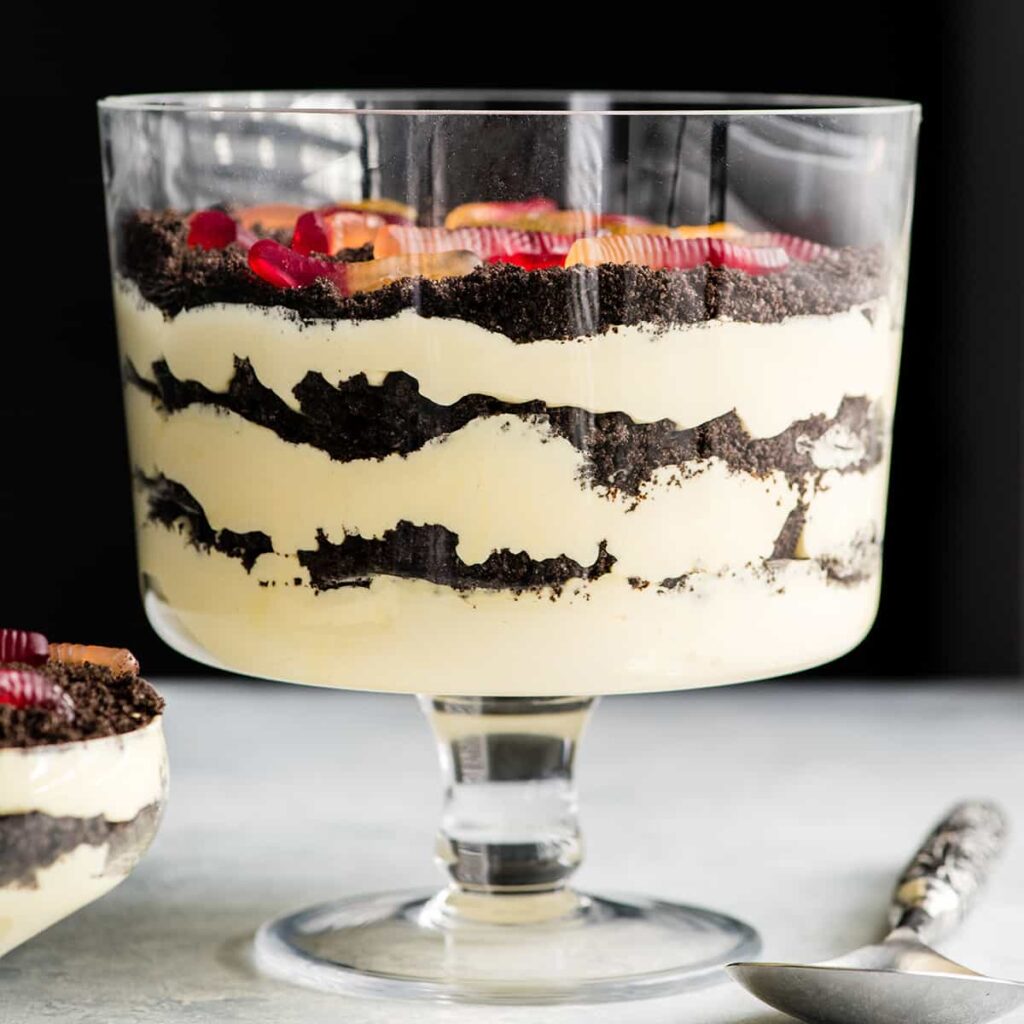
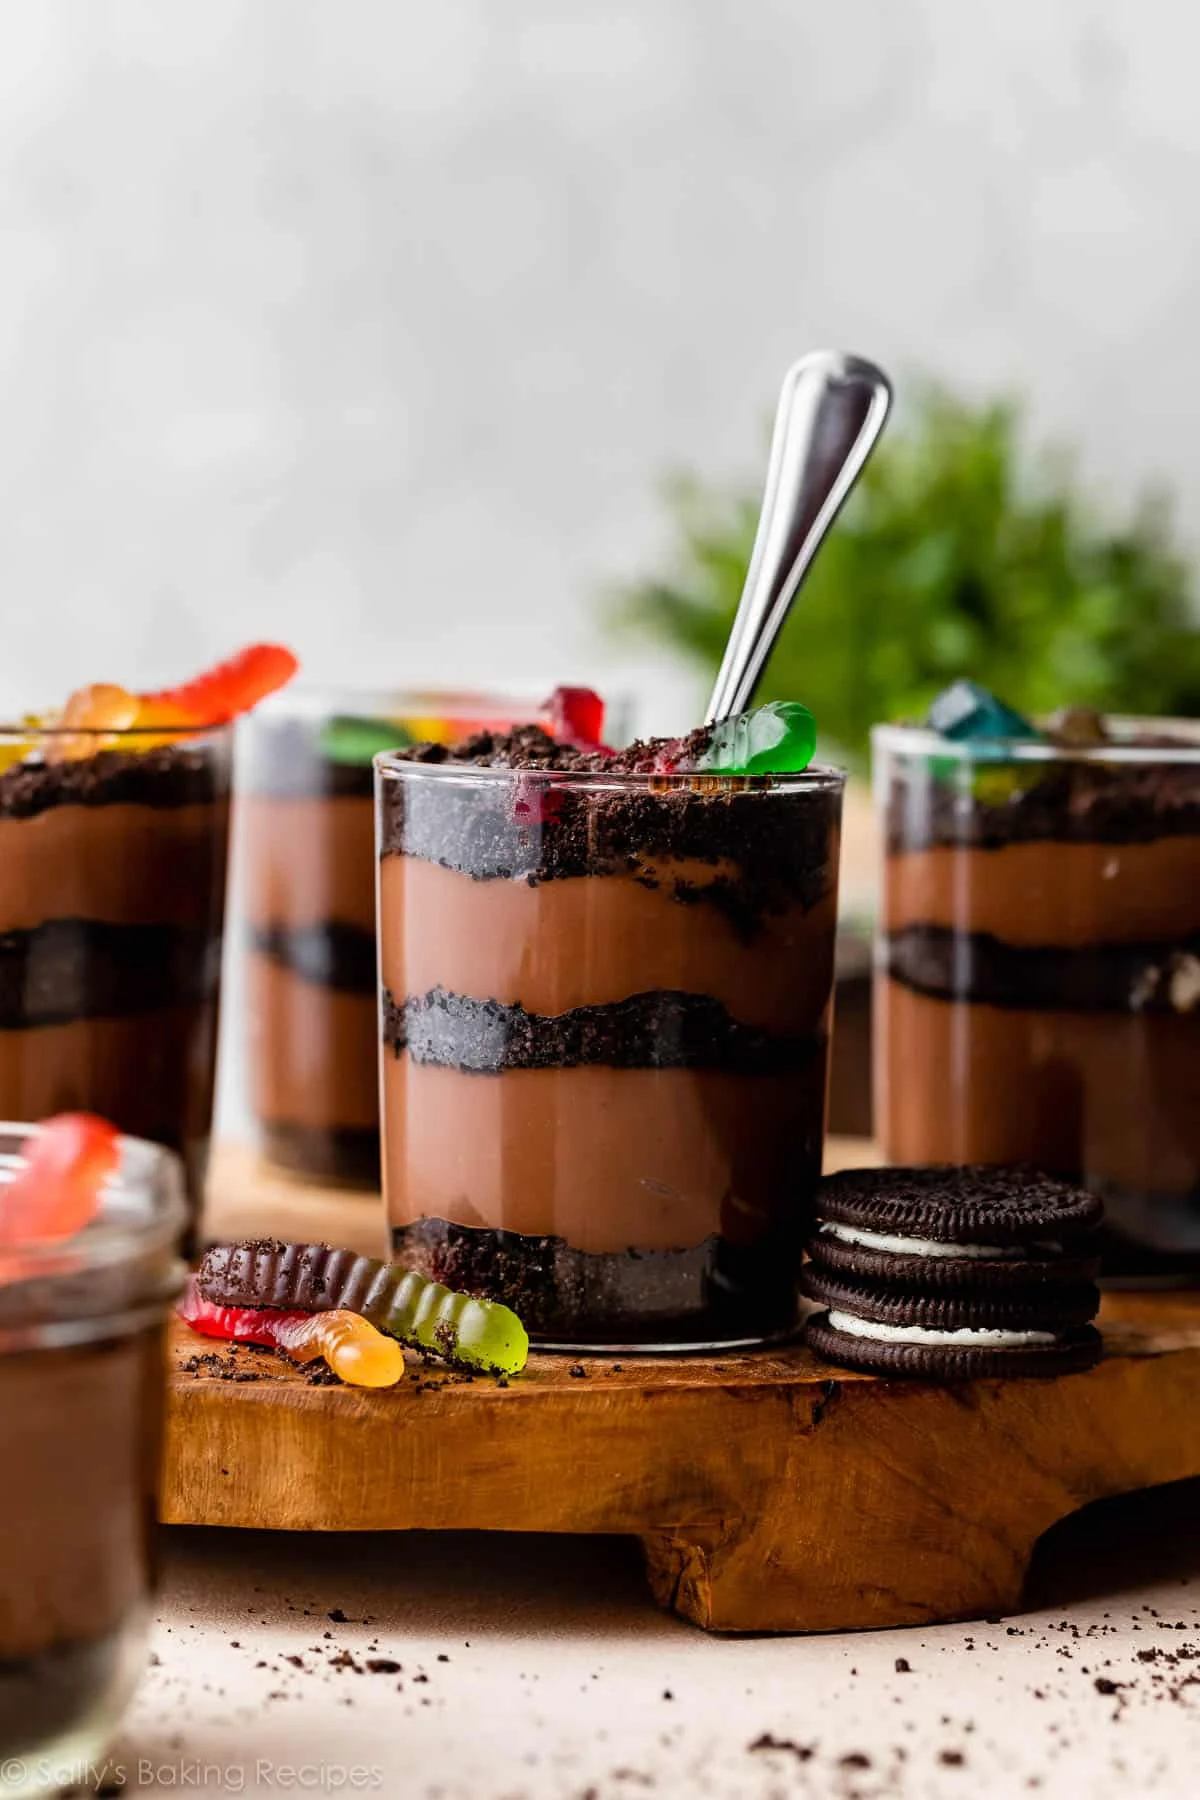
Layer it up: Add Oreo crumbs, pudding, more crumbs, more pudding, and finish with crumbs on top.
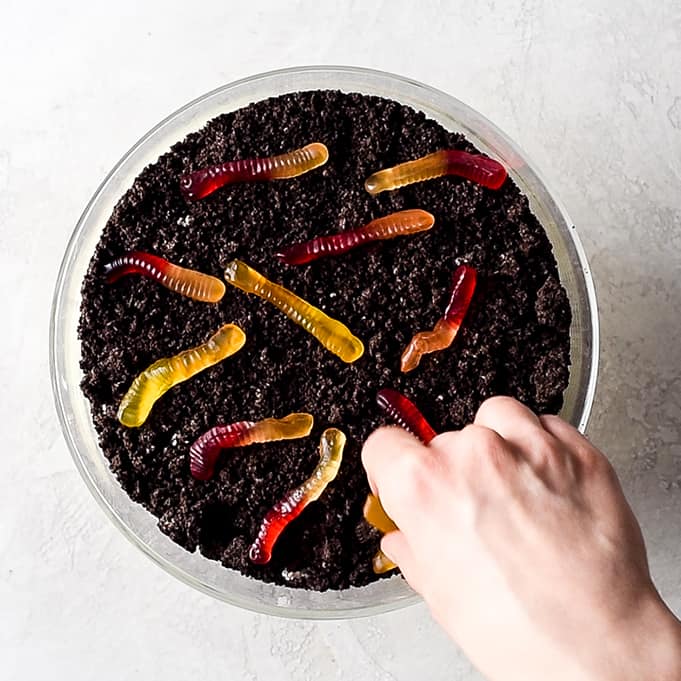
Add the worms: Place gummy worms on top like they’re living their best life.
Chill again: Refrigerate for 3 more hours before serving.
Tips You Must Know
Whisk Like You Mean It: The pudding needs attention. Walk away, and it might turn on you.
Don’t Rush the Heat: Medium heat is your friend. High heat is chaos.
Taste Before Serving: Adjust sweetness or add a pinch of salt if needed. It makes a difference.
Crumb Texture Matters: Don’t turn Oreos into dust. A little texture makes it better.
Let It Chill Properly: The second chill is where everything comes together.
Butter at the End: Adding it off heat keeps things smooth and rich.
Use Real Vanilla: It’s a small thing, but it shows up in the flavor.
Layer Generously: Thin layers are sad layers. Go bold.
Variations You Will Enjoy Trying
Peanut Butter Twist: Add a spoon of peanut butter into the pudding. It’s dangerously good.
Mint Chocolate Version: Use mint Oreos for a fresh twist.
Coffee Kick: Add a teaspoon of instant coffee to the pudding mix for depth.
Caramel Layer: Drizzle caramel between layers for a richer dessert.
Vanilla-Chocolate Combo: Alternate chocolate pudding with vanilla pudding.
Fruit Surprise: Add sliced bananas between layers. Trust me on this.
Crunch Upgrade: Mix crushed pretzels with Oreos for a salty crunch.
Adult Version: A tiny splash of liqueur in the pudding. Optional, but fun.
Dirt Pudding Recipe
Rich chocolate pudding layered with Oreo crumbs and topped with gummy worms, creating a fun, creamy, and indulgent dessert treat.
In a medium saucepan, whisk together sugar, cocoa powder, cornstarch, and salt.
Place over medium heat and slowly pour in milk while whisking until fully combined.
Bring to a boil, whisking occasionally (about 10 minutes). Do not increase heat.
Once bubbling in the center, whisk constantly and boil for 1 minute until thickened.
Remove from heat and whisk in butter and vanilla.
Chill the Pudding
Pour pudding into a heatproof bowl and let sit for 5 minutes.
Place plastic wrap directly on the surface to prevent a skin.
Refrigerate for 1 hour (it should still be slightly soft for layering).
Prepare Oreo Crumbs
Pulse Oreo cookies in a food processor or blender until fine crumbs form.
Assemble the Dessert
Add a layer of Oreo crumbs to the bottom of each cup (a few tablespoons).
Spoon about 1/4 cup pudding over crumbs.
Add another layer of Oreo crumbs, followed by more pudding.
Finish with a top layer of Oreo crumbs.
Add gummy worms on top.
Chill and Serve
Refrigerate uncovered for at least 3 hours (up to 48 hours).
Serve chilled.
Do not rush pudding cooking; proper thickening requires steady heat.
Whole milk gives the best texture and richness.
Layer in clear cups for a more appealing presentation.
Nutritional Table (Approximate per serving)
Nutrient
Amount
Calories
320 kcal
Carbohydrates
48 g
Fat
12 g
Protein
5 g
Storage and Leftover Tips
Fridge Is Your Friend: Keep it covered and refrigerated for up to 3 days.
Plastic Wrap Trick: Always press it against the surface to avoid that skin.
Don’t Freeze It: The texture gets weird. Learned that the hard way.
Refresh Before Serving: Add a few fresh Oreo crumbs on top.
Keep Worms Separate: If storing long, add gummy worms just before serving.
Use Airtight Containers: Keeps everything fresh and prevents fridge smells.
Stir Leftover Pudding: If it thickens too much, give it a gentle stir.
How I Like to Serve This Dish
Individual Cups: Feels a little fancy without trying too hard.
Big Bowl Style: Scoop and serve. No rules.
Clear Glasses: So you can actually see those layers.
Extra Toppings: More worms, more crumbs, maybe some chocolate chips.
Cold, Always Cold: This is not a room-temperature dessert for me.
With a Spoon You Love: Sounds silly, but it matters.
Straight from the Fridge at Midnight: Highly recommended.
FAQs
Can I use store-bought pudding? Yes, but homemade really does taste better.
Can I make it ahead of time? Absolutely. It actually gets better after a few hours.
What if I don’t have cornstarch? You can try flour, but the texture will be different.
Can I use plant-based milk? It might not thicken the same, but it’s worth experimenting.
Do I have to use gummy worms? Not at all, but they’re half the fun.
Can kids help make this? Yes, especially the layering part. It’s messy in a good way.
How do I know the pudding is ready? It should coat the back of a spoon without dripping.
Can I double the recipe? Yes, just use a bigger pot and a little extra patience.
The Last Bite
If you ever need a dessert that feels like a small celebration without any pressure, this is it. It’s messy, a little silly, and completely comforting. And if your first batch isn’t perfect, welcome to the club. That just means you get to make it again.


Leave a Reply